Here, we will show you all the details you need to know about Azure Automation and au2mator Self-Service Portal.
TABLE OF CONTENTS
Prerequisites
To connect au2mator Self-Service Portal to Azure Automation, we need to create an Azure App Registration for the authentication. Follow the Steps for Details
- Login to Azure Portal and navigate to "App Registrations."

- Click on the "New Registration" Button on the Top

- Enter a Name and Clik "Register" on the bottom

- On the next page, please take note of your "Application (Client) ID and your Directory (tenant) ID. We need these IDs later.

- Next, click on "Certificates & secrets."

- Click on "New client secret."

- Enter a Name, select expiration Date, and click "Add."

- On the next page, make sure you copy your Client Secret. Once you navigate to a different page, you will not get the Client Secret again.

9. We have now configured the Azure app Registration. Now follow the next Chapter to configure Permissions for the Azure App
Configure Permissions for your App Registration
- Login to Azure Portal and Navigate to your Automation Account, which you would like to access from au2mator Portal.
- Navigate to your Resource Group, where your Automation Account is in

- Click on "Access control (IAM)

- Click on the "Add" button to add a New User Assignment

- Select "Contributor" as a Role and select your Azure App from the User Picker

- Click on the "Save" Button

To configure au2mator Self-Service Portal and Azure Automation you need three ID's from the above Configuration

- Application (Client) ID
- Directory (tenant) ID
- Azure App Reg Secret
See our How to configure Automation Engines in au2mator for more Details
Create an Azure Automation Runbook for au2mator
Create your Azure Automation Runbook. The Runbook Types we support are
- PowerShell (every Version)
- PowerShell Workflow
- Graphical PowerShell Workflow
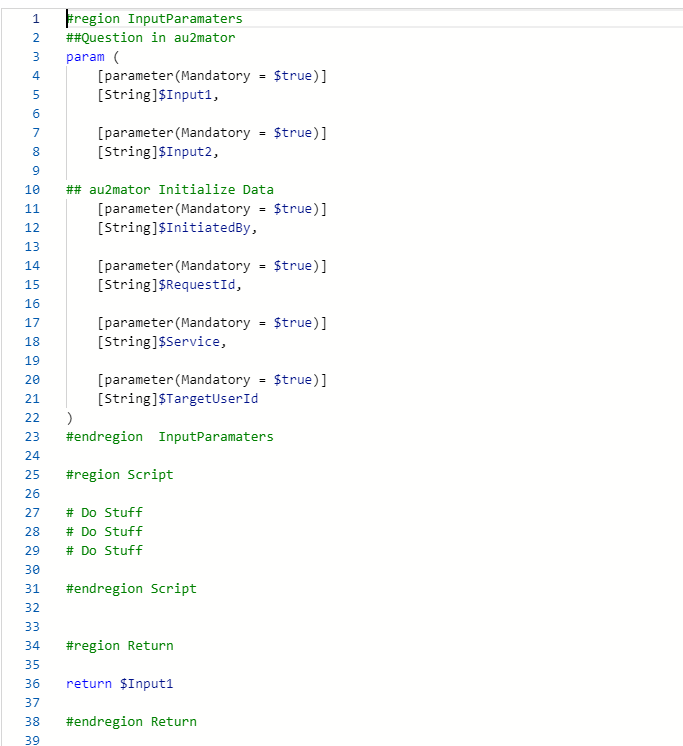
Prepare the script. This is an example. The Important Stuff is
- Input Parameters
- This is used as your Questions in au2mator
- Please take note of our Built-In Initialize Data Parameters
- Your Script
- That's is your Magic, and it is absolutely up to you
- Return
- with the Return function, you can write values back to au2mator, which is shown in the Service Details Job Data
The script below is ready to use at Azure Automation.
Save the Runbook and Publish it.
We have a lot of free Scripts at au2mator GmbH (github.com)
Was this article helpful?
That’s Great!
Thank you for your feedback
Sorry! We couldn't be helpful
Thank you for your feedback
Feedback sent
We appreciate your effort and will try to fix the article